Almost all modern cameras will come with auto or Program (P) mode, which attempts to properly expose photographs. However, auto mode won’t always understand the intention of the photographer, which is where manual mode truly shines. In order to properly operate a camera manually, the three exposure settings must be understood and mastered.
The exposure of a photograph is affected by three major settings: the aperture, shutter speed, and ISO (commonly referred to as the “exposure triangle”). The exposure will affect the amount of light that is captured in a photograph, which affects how dark or bright a photo is. Mastering the control of the exposure triangle is one of the primary goals of a photographer. Understanding camera exposure is one of a photographer’s first lessons, but could potentially be a life-long journey.
When taking a photograph, you will need a certain amount of exposure. In other words, you need to collect a certain amount of light. How much is an arbitrary measure; there is no “correct” amount, though if a photo comes out all black (extreme underexposure), or all white (extreme overexposure), then there was probably something done unintentionally with regards to the exposure settings. Basically, the photograph should come out reasonably visible at the very minimum. Ultimately, how dark or bright a photograph is going to be depends on the taste of the photographer unless auto-exposure mode is used.
So what are aperture, shutter speed, and ISO and how do they affect a photograph?
Aperture
The aperture determines how open the lens is for a given focal length (or, without zooming). It can be open wide or narrow. Consequently, this affects how much light reaches a camera’s sensors. A wide open aperture allows in more light while a narrow aperture allows in less. In addition, aperture can affect depth of field, which can affect how much of the photograph is sharp and in focus.
A wide open aperture will have a smaller depth of field, with only the focal point (or, the subject) in focus and everything beyond that field would be out of focus. A narrow aperture has a large depth of field will have more of the photograph in focus, the drawback being that less light enters the camera, which is to be balanced by the other two settings. More on this later.
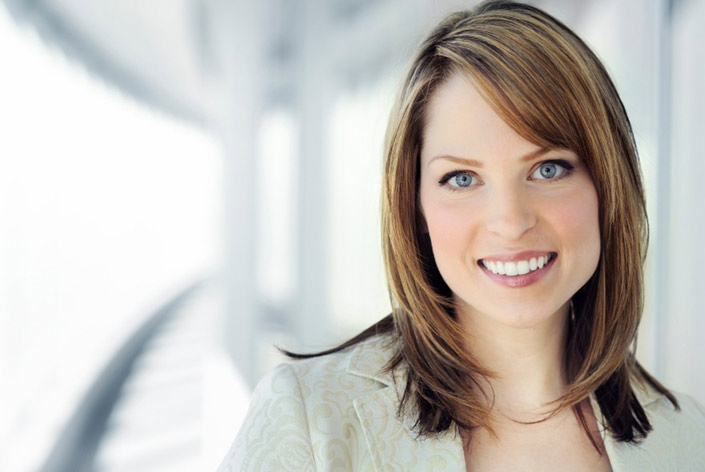
A wide open aperture was used here. The subject is in focus with the area behind her blurry.
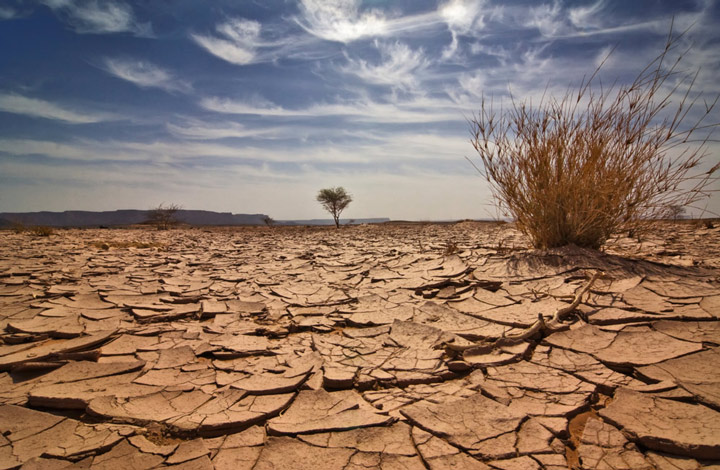
A narrow aperture was used for this landscape photo. Everything is focus, and there is no specific subject other than the scenery.
Shutter Speed
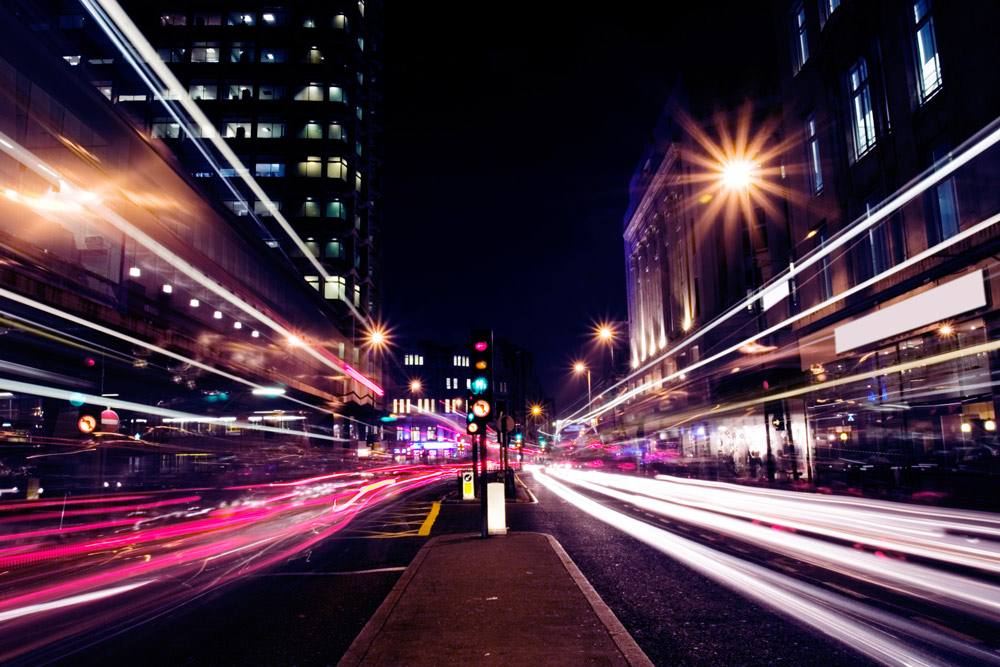
A very slow shutter speed was used, which created the long streaks of light you see here.
Other than exposure to light, one of the primary considerations for shutter speed is how much movement is there to capture in a picture. Fast action will require faster shutter speeds in order to “freeze” that action in the photograph. On the other hand, the slower the shutter speed is for a given action, the more motion blur will be introduced into the photograph. On very slow shutter speeds, the camera must be held steady to reduce camera shake from being introduced into the photograph (camera shake will cause the entire image to become blurry, which is pretty much always an undesirable effect). There are many artistic effects which can be achieved and controlled by using slower shutter speeds.
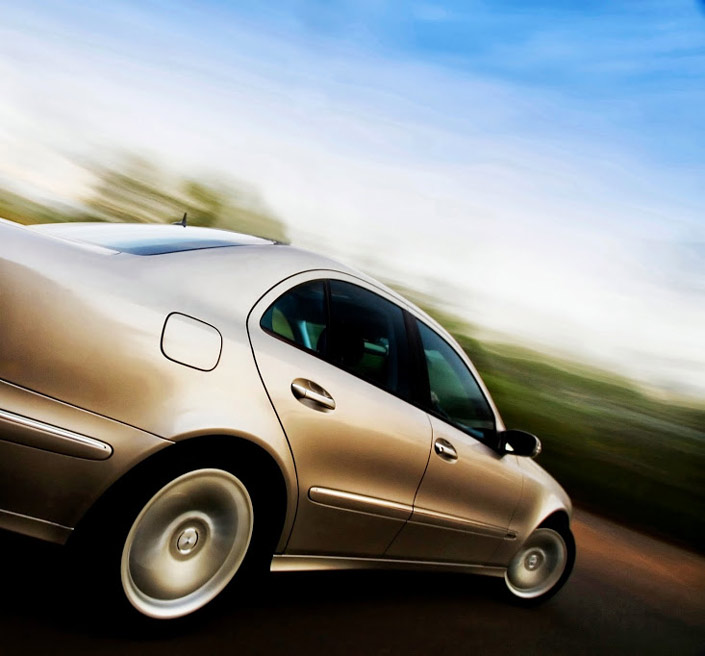
A faster shutter speed was able to make this fast-moving car appear nearly frozen. Of course, it was not fast enough to capture the faster-spinning wheels, evidence of the motion blur of the wheels
ISO Sensitivity
The ISO setting affects how sensitive a camera sensor is to a particular amount of light. Think of it as having a “burn” effect. The higher the ISO sensitivity, the more light will “burn” onto the photograph. It is similar to tanning your skin, except instead of becoming darker, the photograph becomes brighter. It is one way to increase exposure, but one that introduces undesirable qualities into the photo: noise (a grainy, sandy texture). In the same way that tanning too much is bad for a person’s skin, too strong an ISO sensitivity can ruin a photograph.

Low ISO

High ISO, appears grainy
The Numbers

Aperture openings
Shutter speed is often expressed as the time that the shutter is held open, such as 1/1000 second, 1/100 second, 1 second, 30 seconds, etc. Generally, the slowest shutter speed for a hand-held camera is equal to the inverse of the focal length of the lens. For example, with a 50 mm lens, the slowest shutter speed is about 1/50 second. Anything slower would require divinely steady hands or a tripod, though this does not account for movement in the photo, e.g. movement by a subject that cannot sit still. You have to account for both camera motion and subject(s) motion when selecting the shutter speed.
ISO is measured by a number starting at 100 and increasing from there. For example: 100, 200, 400, 800, 1600, and so on.
Interaction Between Aperture, Shutter Speed, and ISO
Suppose you need to control the exposure in a camera, and you need more light. You have three options: increase aperture, slow down the shutter speed, or increase ISO, and vice versa for less exposure. Which ones to adjust depend on the quality of photograph you want. We know that aperture will affect depth of field/background blurriness, shutter speed will affect how motion appears, and ISO will introduce noise.
Let’s say you have the right amount of exposure, but you halve the aperture (you closed the aperture, letting in less light). You need to bring light back in with the other two settings, either by doubling the shutter speed or increasing the ISO by an equivalence of doubling the light.
Here is a table showing example changes to each setting with increasing stops of light (equivalent to doubling the light):
| F-stops | Relative Light | Aperture | Shutter Speed | ISO |
|---|---|---|---|---|
| Starting point | 1x | f/22 | 1/4000 s | 100 |
| 1 | 2x | f/16 | 1/2000 s | 200 |
| 2 | 4x | f/11 | 1/1000 seconds | 400 |
| 3 | 8x | f/8 | 1/500 seconds | 800 |
| 4 | 16x | f/5.6 | 1/250 seconds | 1600 |
| 5 | 32x | f/4 | 1/125 seconds | 3200 |
| 6 | 64x | f/2.8 | 1/60 seconds | 6400 |
| 7 | 128x | f/2 | 1/30 seconds | 12800 |
| 8 | 256x | f/1.4 | 1/15 seconds | 25600 |
Written by: Brandon Yuong