 First of all, what is a “tack sharp” image? In photography, a tack sharp photograph refers to an image which has the very best detail and clarity. The point of focus is where it was intended, has well-balanced contrast, and is crisp and sharp with no visible blur when pixel-peeping.
A tack sharp image must be achieved during capture and cannot be improved via post-processing. Photoshop’s contrast and sharpening adjustments cannot save you. Since it is the only way, it is critical that you learn the proper camera techniques if you wish to capture tack sharp images.
Basic Techniques for Tack Sharp Images
One of the most challenging obstacles for new photographers is to know how to choose appropriate shutter speeds for tack sharp images. Of course there is no black and white rule set to the correct method of photographing, but when it comes to tack sharp images, blurriness is an indication of incorrect shutter speeds and/or camera handling. The three major contributors to ruining image sharpness:
1. The camera budged during shutter release (handling error).
2. Shutter speed is too slow for a moving subject.
3. The focus was missed.
Notice that all of these factors are directly attributed to the photographer and are factors that can be corrected with proper technique.
Camera Shake
 There are several ways to reduce camera shake, which essentially ruins a photograph by blurring it entirely. When hand held, the rule of thumb is that the shutter speed should be the reciprocal of the effective focal length (35mm equivalent length). So for a 70mm effective focal length lens, the shutter speed should be 1/70 seconds or faster to avoid blur caused by camera shake. Depending on how steady or unsteady your hands are, your results may vary.
What is effective focal length? It is the focal length equivalent of 35mm format lenses. Cameras with smaller sensors will have larger crop factors, such as 1.5 or 2.0. With these cameras, you must multiply their lens length by the crop factor to get the 35mm equivalent/effective focal length.
Another way to reduce camera shake is to use a tripod, which also allows for slower shutter speeds to be used. Be wary of the different build qualities you can get from a tripod. A lower build quality tripod is more susceptible to winds and disturbances.
Image stabilization (IS) technology is also another way to reduce camera shake. With IS, it is possible to hand hold at 2-4 stops below the rule of thumb. Also be sure to turn off IS when using a tripod. When the camera is looking for motion where there isn’t any, IS may generate motion of its own.
Also, pressing the shutter button oftentimes generates initial shake on the camera. This can be avoided by using a delayed 2-second release mode or a remote shutter control.
Motion Blur
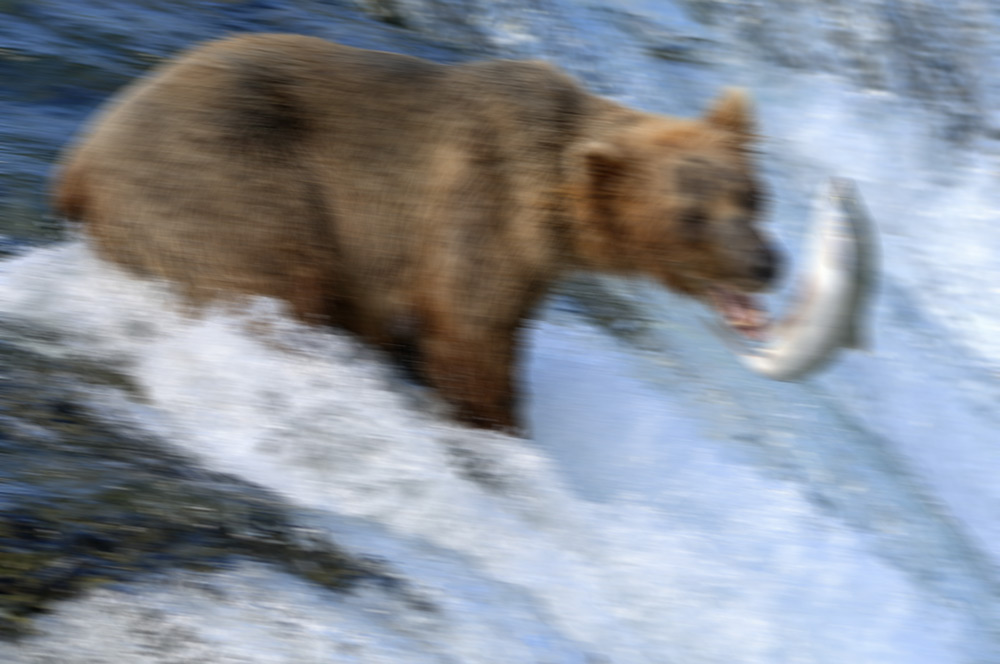
You want to photograph a moving subject, so what shutter speed should you use? The answer depends on whether you want to portray motion or freeze the action.
It is reasonable to have the main parts of a subject tack sharp and the wings or limbs showing motion blur. Or, you may want a moving subject completely frozen, or tack sharp overall.
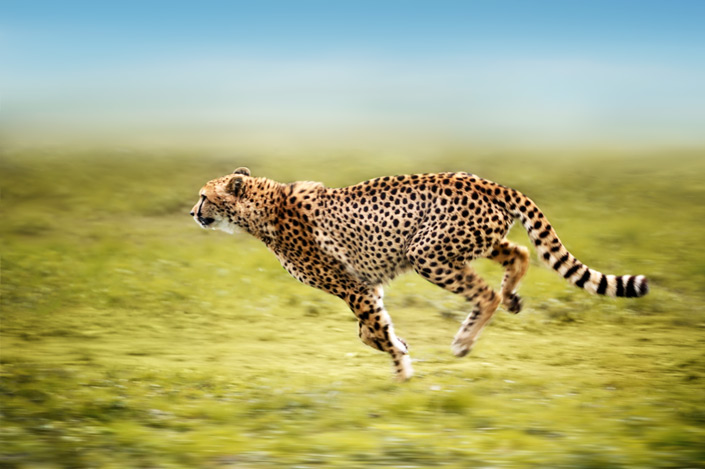
The cheetah is mostly tack sharp, yet its legs portray motion.
Here are some example shutter speeds and intended effects:
| Shutter Speed | Effects |
|---|---|
| 1/4000 s | Freezing extreme motion |
| 1/2000 s | Freezing flying birds |
| 1/1000 s | Freezing fast cars |
| 1/500 s | Freezing dancers, runners, cyclists |
| 1/250 s | Freezing a walking person |
| 1/125 s | Panning fast cars |
| 1/60 s | Panning cyclicsts at close range |
| 1/30 s | Panning cyclists at a distance |
| 1/15 s | Panning runners or animals |
| 1/8 s | Blurring water flow at close range |
| 1/4 s | Blurring people at walking paces |
| 1/2 s | Blurring slow water flow |
| 1+ s | Lights at night or creating misty-looking water |
Faster shutter speeds are used for freezing action while the slowest speeds are used for artistic effects or properly exposing stationary subjects/scenery.
Advanced Techniques for Tack Sharp Images
Being able to nail the focus is key to taking tack sharp images. This section is about a set of techniques that makes it easier to acquire sharp focus in a variety of situations but has a lot of bias in terms of how to set up your workflow. If you are someone who likes to manually control every aspect of your photography, these tips will help you greatly improve your ability to achieve tack sharp images. These techniques are what work for me and were passed to me from EVERY professional photographer that I have heard of. I will let you decide for yourself what works for you.
Using Single Point AF
Start using single point AF (AF-S). There are times when you will need automatic AF (AF-A), such as when doing photojournalistic work, but for 95% of photography, using single point AF and manually controlling its position is the best way to achieve tack sharp focus (not to be confused with manual focusing/MF). While most of the time your camera will be able to focus automatically on the subject because it is so prominent in the frame, there will be plenty of occasions where it will be confused, such as when using prime lenses and thin depth of field. You wouldn’t want the camera to focus on the tip of a person’s nose or ear and have his or her eyes out of focus.
Using Back Button AF
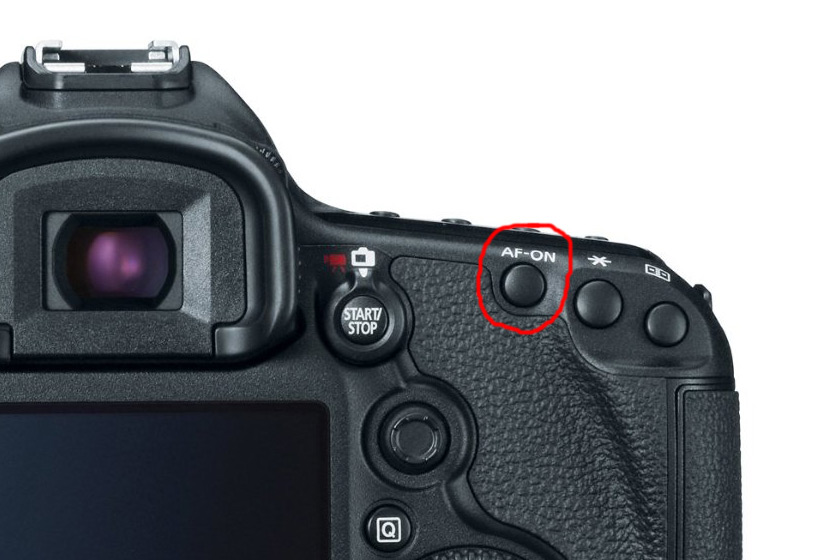
Canon 5D Mark III Back Button AF
On the other hand, the back button AF method has few drawbacks and is very reliable in many situations. Using the back button AF allows you to keep your focus constant throughout all your shots until you press it again, leaving your shutter button free to be used only as a shutter releaser. It’s better to limit every button to one function than to fumble with having multiple functions assigned to one button. A similar way to achieve the flexibility of back button AF is to switch the lens to MF every time your focus has been acquired. But then you have to remember to switch back to AF for your next shots, how inconvenient.
Examples of situations where back button AF proves to be much better:
Situation #1: You’re doing a studio photo shoot for a client and he or she isn’t changing positions. You can just back button AF once, and then you can just hit the shutter button to fire away without having to refocus every time.
Situation #2: You mount your camera on a tripod for a few landscape shots. With back button AF, you can just frame the shot and focus once, then fire away whenever you’re ready without having to refocus each time.
 Situation #3: You AF to acquire a rough focus of your subject and then use MF to refine the accuracy. Then, you can release the shutter without the camera trying to refocus.
Situation #4: You acquire focus on your subject, but lots of people are walking through the frame. With back button focus, the camera won’t try to refocus on the new objects each time you try to release the shutter.
Situation #5: You are using Al Servo mode, so you can just hold down the back button AF the whole time and fire the shutter button whenever you want, which is much easier than half-pressing after each shot.
Al Servo
Al Servo (or continuous AF/AF-C) is a very handy mode when used with back button focus. When the depth of field is thin and the subjects are moving towards you, the chance of capturing the image in focus is slim. With single shot focus, you either have to focus and shoot as quickly as possible or pre-focus to a spot where the subjects are moving into and release the shutter when they reach it. That’s very risky if you only have once chance for the shot. Instead, you could use Al Servo to continuously track your subjects and fire away as many shots as you can.
The beauty of back button focus and Al Servo is that the combination can be used like single shot focus: you just release the back button when you have the focus. It will stop hunting and remain constant.
Conclusion
Getting tack sharp photos is all about being able to keep your camera steady, knowing how to use the camera’s shutter speed to achieve the effects that you want without unintentional blur, and being able to accurately focus the subject for any situation. These tips vastly improved my technical skill and photography when I first integrated them into my work flow, and I hope they will work well for you also.
Written by: Brandon Yuong